


Let's Dive Deeper!
One of the biggest benefits of Brain-Score is its integrative benchmarking, which allows users to submit a model and evaluate its performance across multiple benchmarks. This often leads to new insights and interesting findings.
In this second Deep Dive, we will examine a sample Brain-Score submission package containing the model ResNet-50. You can then base your own unique submission packages on this sample. In Deep Dive 3 we'll explore custom model submissions and how to submit models via GitHub Pull Requests.
NOTE: Please do not submit the tutorial package itself via PR or the website!
Part 1: Install Necessary Packages with the Quickstart Tutorial
We highly recommend completing the Quickstart Tutorial before starting this Deep Dive. The Quickstart explains how to install the necessary packages for Brain-Score and also gives insight into what model scores mean, and how to score a model locally on a single, publicly available benchmark.
Part 2: Locate the resnet50_tutorial Model Package:
Brain-Score allows users to submit packages in two ways: directly to the site, via a Zip file upload, or through a Github PR. In this Deep Dive, you will explore a sample model submission in order to become familiar with the submission package structure. Here you can view the sample submission folder. This sample submission folder contains a properly formatted, stock version of ResNet-50 pretrained on ImageNet.
Part 3: Exploring the Starter Submission Folder
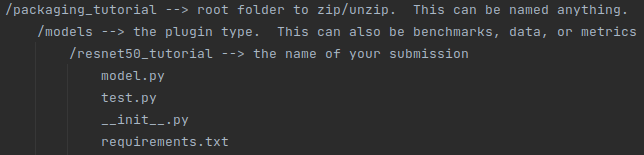
The correct overall structure for a model submission package is shown in the code inset below. The root folder can be named anything (in this case it's called "packaging_tutorial"). The root folder contains another folder for the plugin itself, in this case /models. This /models folder then contains a folder called /resnet50_tutorial. (NOTE: If you plan to submit through the website, the contents of your zip file must be structured using this folder structure).
The resnet50_tutorial folder in the repo is an example of a properly formatted submission folder (NOTE: this is only innermost folder in the code inset. If you submit through the website ensure you place it properly in the required folder structure in your zip file). This folder contains 3 Python files and a single .txt file. Just like this example, all submissions must contain at least three Python files: __init__.py, test.py, and model.py (these are required). The other file: requirements.txt, is optional but will be examined below along with the required files. Let's explore further with the first required file, __init__.py file.
Part 4: Exploring the __init__.py file
The example __init__.py file adds your plugin to the Brain-Score plugin registry and to the Brain-Score ecosystem at large. You are registering your model to a unique global identifier. You can see that this file is fairly straightforward. Lines 1-3 are standard imports, and line 5 adds the plugin to the registry. Please note: Brain-Score does not allow duplicate plugin names, so if you submit another version of the same model, make sure to make the identifier unique!
1       from brainscore_vision import model_registry
2       from brainscore_vision.model_helpers.brain_transformation import ModelCommitment
3       from .model import get_model, get_layers
4
5       model_registry['resnet50_tutorial'] = lambda: ModelCommitment(identifier='resnet50_tutorial', activations_model=get_model('resnet50_tutorial'), layers=get_layers('resnet50_tutorial'))
Also note: It would be prohibitively time- and resource-consuming to actually load every plugin in a registry before they are needed, so the plugin discovery process relies on string parsing. Thus, it’s not possible to programmatically add plugin identifiers to the registry; each registration needs to be written explicitly in the form of plugin_registry['my_plugin_identifier'] Next, let’s check out the second required file, test.py file.
Part 5: Exploring the test.py File
The example test.py file included in the resnet50_tutorial package contains a Python test function designed to test if a model loaded with the brainscore_vision.load_model function has the correct identifier. The test function, test_has_identifier(), loads a model named 'resnet50_tutorial' and asserts that the identifier attribute of the loaded model matches the expected string 'resnet50_tutorial'. This example test.py is only a temporary placeholder, as the Brain-Score Team is currently writing a suite of tests that can be incorporated into this file, that every model will run. When submitting a model, a test.py file must be included in the submission package (though it can be left blank).
1       import pytest
2       import brainscore_vision
3
4
6       def test_has_identifier():
7           model = brainscore_vision.load_model('resnet50_tutorial')
8           assert model.identifier == 'resnet50_tutorial'
Part 6: Exploring the model.py File
Here is an example model.py file. This is where a user would actually define the model, load weights, and wrap it into a Brain-Score model. Let’s explore this file in more detail: Lines 1 - 5 are standard imports. Lines 15-21 define the get_model() function that loads the model. You can see on line 17 the model itself is being loaded from pytorch. Line 20 is used to define the input size for the network being passed in. Lines 24 - 26 contain the get_layers() function, which returns the layers you are interested in scoring. Layer names will typically follow pytorch conventions. Lines 29 and 30 define the Bibtex for the model. You can leave this blank when submitting, but we highly recommend you add a reference. Finally, lines 33 - 34 call the model on what's called a MockBenchmark which uses artificially generated data sufficient to check the model's integrity, but meaningless as a benchmark.
An alternative approach to passing in layer names can be seen here. And if you have a custom model that you have created yourself, check out our Custom Model Submission Guide in Deep Dive 3.
1       from brainscore_vision.model_helpers.check_submission import check_models
2       import functools
3       import torchvision.models
4       from brainscore_vision.model_helpers.activations.pytorch import PytorchWrapper
5       from brainscore_vision.model_helpers.activations.pytorch import load_preprocess_images
6
7       # This is an example implementation for submitting resnet-50 as a pytorch model
8
9       # Attention: It is important, that the wrapper identifier is unique per model!
10      # The results will otherwise be the same due to brain-scores internal result caching mechanism.
11      # Please load your pytorch model for usage in CPU. There won't be GPUs available for scoring your model.
12      # If the model requires a GPU, contact the brain-score team directly.
13
14
15      def get_model(name):
16          assert name == 'resnet50_tutorial'
17          model = torchvision.models.resnet50(pretrained=True)
18          preprocessing = functools.partial(load_preprocess_images, image_size=224)
19          wrapper = PytorchWrapper(identifier='resnet50_tutorial', model=model, preprocessing=preprocessing)
20          wrapper.image_size = 224
21          return wrapper
22
23
24      def get_layers(name):
25          assert name == 'resnet50_tutorial'
26          return ['conv1','layer1', 'layer2', 'layer3', 'layer4', 'fc']
27
28
29      def get_bibtex(model_identifier):
30          return """"""
31
32
33      if __name__ == '__main__':
34          check_models.check_base_models(__name__)
Part 7: Exploring an (optional) requirements.txt File
The (optional) requirements.txt file is where you can add any requirements that your model needs (such as a specific version of a package or an external git repository). You can do this by simply adding the packages to this file as shown in the example.
1       torchvision
2       torch
Note: The requirements.txt file is optional because a pyproject file can also be used to add requirements. If your model needs no extra packages, you can exclude this file from the submission package entirely.
Part 8: Putting it All Together
You are almost done! If you were actually submitting a model, the final step prior to submission would be to run your model locally to ensure that everything is in working order. You can do this by first following the Quickstart Tutorial to install the necessary packages for Brain-Score. Then, (as explained in the Quickstart) make sure your working directory is /vision, and run the command below to score the model YOUR_MODEL_IDENTIFIER on the publicly available data of a benchmark called MajajHong2015public.IT-pls. (NOTE: Make sure to replace YOUR_MODEL_IDENTIFIER with the actual model identifier you used to add your mode to the Brain-Score model registry in __init__.py.)
python brainscore_vision score --model_identifier='YOUR_MODEL_IDENTIFIER' --benchmark_identifier='MajajHong2015public.IT-pls'
Upon scoring completion, you should get a message like below:
<xarray.Score ()>
array(0.07637264)
Attributes:
    error:                 <xarray.Score ()>\narray(0.00548197)
    raw:                   <xarray.Score ()>\narray(0.22545106)\nAttributes:\...
    ceiling:               <xarray.DataArray ()>\narray(0.81579938)\nAttribut...
    model_identifier:      YOUR_MODEL_IDENTIFIER
    benchmark_identifier:  MajajHong2015public.IT-pls
    comment:               layers: {'IT': 'YOUR_MODEL_IDENTIFIER'}


Process finished with exit code 0
These numbers are broken down in the Quickstart Tutorial, but the main point here is that if you get a message that looks like the above (likely with different numbers) then your model is ready to submit. (Please note that compute times may vary significantly depending on your local hardware setup.) Once you successfully run your model locally, you can rezip your package, and you would be ready to submit your model.
When you submit an actual (non-tutorial) model, you'll receive an email with your results within 24 hours. If you would like to explore a custom model submission package, please visit Deep Dive 3.

Part 9: Model Summary Tools
For models built using PyTorch, the torchsummary package can be utilized to get a summary of model information. Install it via pip if necessary (pip install torchsummary), and then use from torchsummary import summary to print a detailed summary of the model. This can be further customized to specify different models by passing the model identifier as an argument to a script.
Here’s how to set up and use a customizable script in PyTorch to summarize different models by specifying a model identifier (you can also embed these commands in your own model or other code):
1. Ensure your environment is set up as per the Quickstart Tutorial.
2. Create a new Python file named modelsummary.py in the vision directory.
3. Copy and paste the following script into the file:
import sys
import torch
import torchvision.models as models
from torchsummary import summary
from argparse import ArgumentParser

def main():
    parser = ArgumentParser(description="PyTorch Model Summary")
    parser.add_argument("model_name", type=str, help="Name of the model to summarize (e.g., 'resnet50')")
    args = parser.parse_args()

    try:
        model = models.__dict__[args.model_name](pretrained=True)
        model = model.to(torch.device("cuda" if torch.cuda.is_available() else "cpu"))
        summary(model, input_size=(3, 224, 224))
    except KeyError:
        print(f"Model '{args.model_name}' is not available in torchvision.")
        sys.exit(1)

if __name__ == "__main__":
    main()
4. Open a terminal, navigate to the vision directory:
cd path/to/vision
5. Run the script by typing the following command, replacing 'model_name'
with the model_identifier (such as alexnet or resnet50) of the model you wish to summarize:
python modelsummary.py model_nameThis will execute the script and print a detailed summary of the specified model, which is invaluable for verifying the correct architecture setup and ensuring that all layers are properly connected and configured before proceeding with model evaluation or deployment.
Moving on...
Our tutorials and FAQs, created with Brain-Score users, aim to cover all bases. However, if issues arise, reach out to our community or consult the troubleshooting guide below for common errors and solutions.