

Contributing Data
In this section, we will explore a sample behavioral benchmark, Ferguson2024. This should serve as a baseline for those interested in packaging their own data, in preparation to turn it into a Brain-Score benchmark.
This section is divided into seven parts: In Part 1, we will install the required packages. In Part 2, we'll access a sample data folder for an example benchmark. In Part 3, we'll take a close look at the contents of the sample data folder. In Part 4, we'll examine the __init__.py file, which adds the data plugin to the data registry (i.e., it tells Brain-Score that your data exists in our system). In Part 5, we'll take a look at the data_packaging.py file. This file shows how we upload and package both your stimuli (via a StimulusSet), and your data (via a DataAssembly). In Part 6, we'll go through a sample test.py file, in which we ensure your benchmark is structured properly. And finally, in Part 7, we'll discuss how all of this ties together.
Part 1: Install Necessary Packages
First, clone the Brain-Score repository to access our code locally. You can do this with commands found on Part 1 of the Model Quickstart. If you have already done the Quickstart, or installed Brain-Score, move on to Part 2.
Part 2: Access the Sample Data Folder
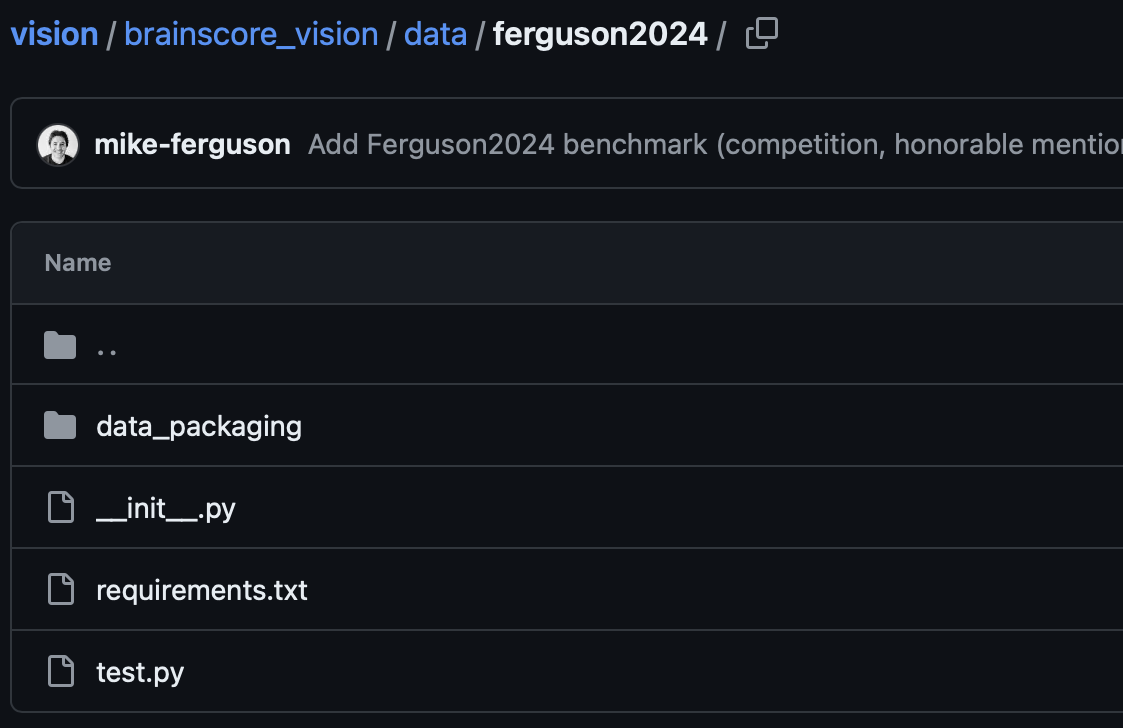
Brain-Score allows users to submit plugins in two ways: directly to the site, via a Zip file upload, or through a Github PR. Here, you will explore a sample data plugin in order to become familiar with its structure; you can view our sample submission in your local version of Brain-Score that you cloned in Part 1. The folder we are going to be exploring is vision/brainscore_vision/data/ferguson2024. If you cannot access a local copy of Brain-Score, the sample data folder is also available on our Github here.
If after following the guidelines in this tutorial, you still have any issues submitting your own benchmark, please reach out to Brain-Score Team member and we will submit your benchmark via a Github PR.
Part 3: Exploring the Sample Data Folder
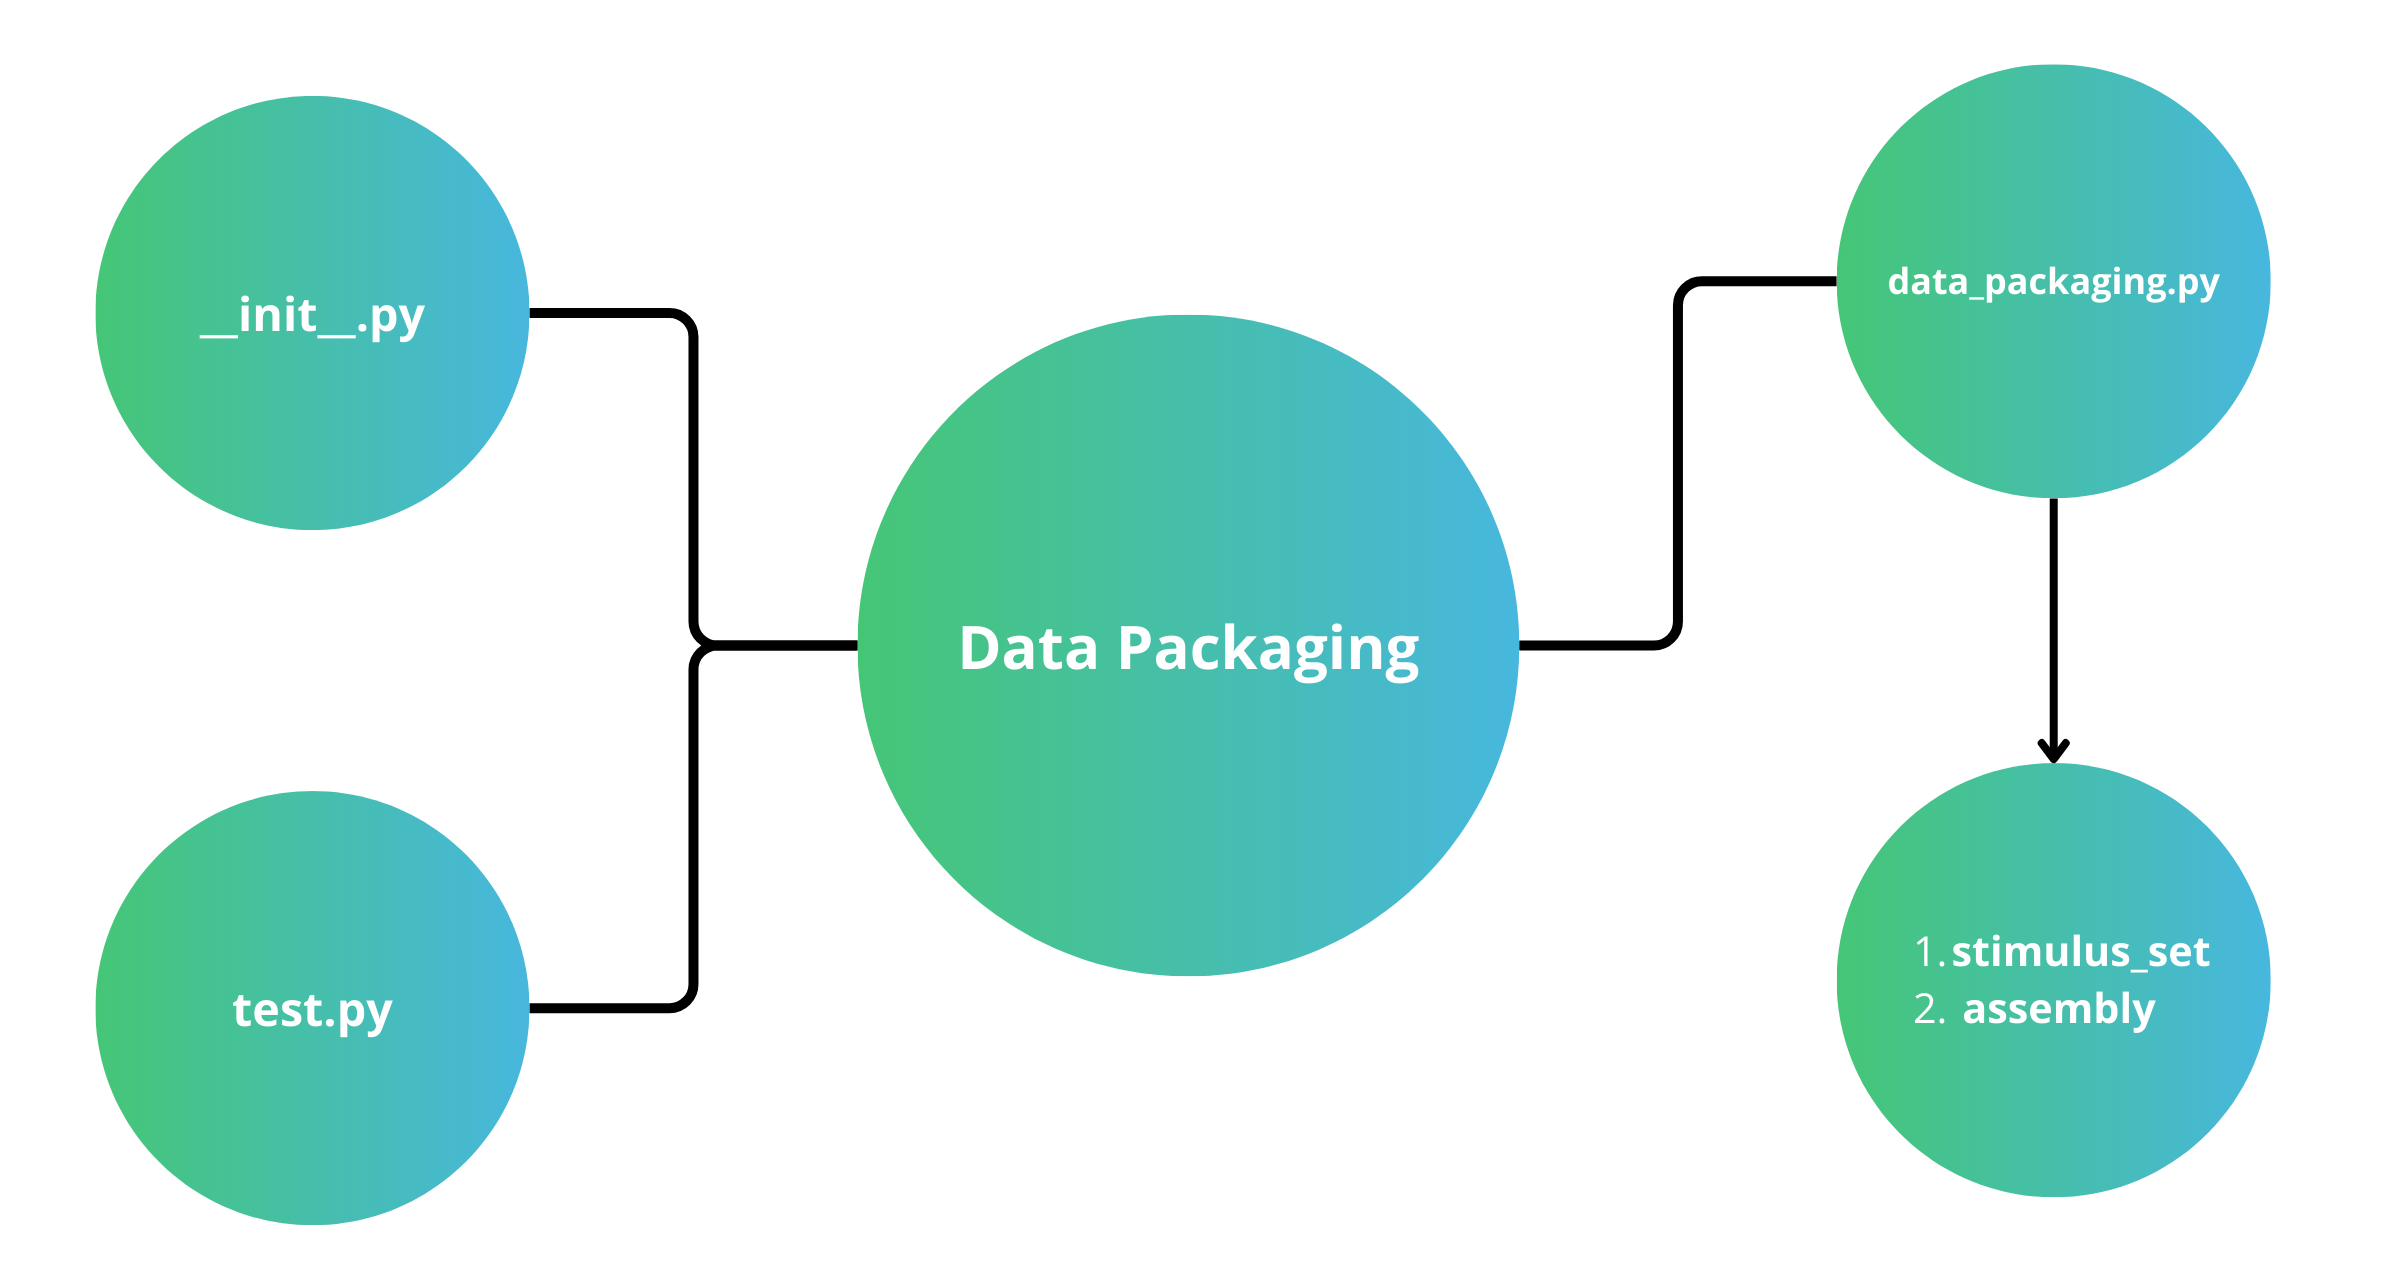
The first thing to notice in the sample data folder is the files themselves: there are 3 files and a folder. We will cover each one in a separate section below.
As a brief overview, the first file is the required __init__.py file, which is what is used to add your data plugin to the Brain-Score registry; i.e, it tells Brain-Score that there is a new data plugin added.
The second file is the requirements.txt file, an optional addition to your data plugin that allows Brain-Score to install any needed dependencies that are used when packaging the data (note: this is not needed if you have already uploaded your data, and for most submitters can be omitted).
The third file is the required test.py file where you can add tests to ensure your data is what you expect. There are many stock tests that Brain-Score provides, and you are encouraged to add more!
Lastly, located in the data_packaging subfolder, is a required file named data_packaging.py. This file ideally is just a copy of code that has already been run locally in order to upload the data, and exists as a backup record if the data needs to be repackaged. This file is the heart of the packaging process, as it reads in stimuli and data, converts them into Brain-Score format, and uploads them to our servers.
Let's start our exploration with the first file to look at: __init__.py
Part 4: Exploring the __init__.py file
This file adds your data plugin to the Brain-Score plugin registry and to the Brain-Score ecosystem at large. You are registering your data to a unique global identifier. You can see that this file is fairly straightforward: Lines 1-3 are standard imports, and lines 8 and 16 add the plugins to the registry (note that in the screenshot there is a StimulusSet (Line 8) as well as a DataAssembly (line 16) being added to the registry - there is more about what these are in Part 5 below). In the future, when you submit your data (or other plugins), you will add the plugin to our ecosystem via a similar call to line 8.
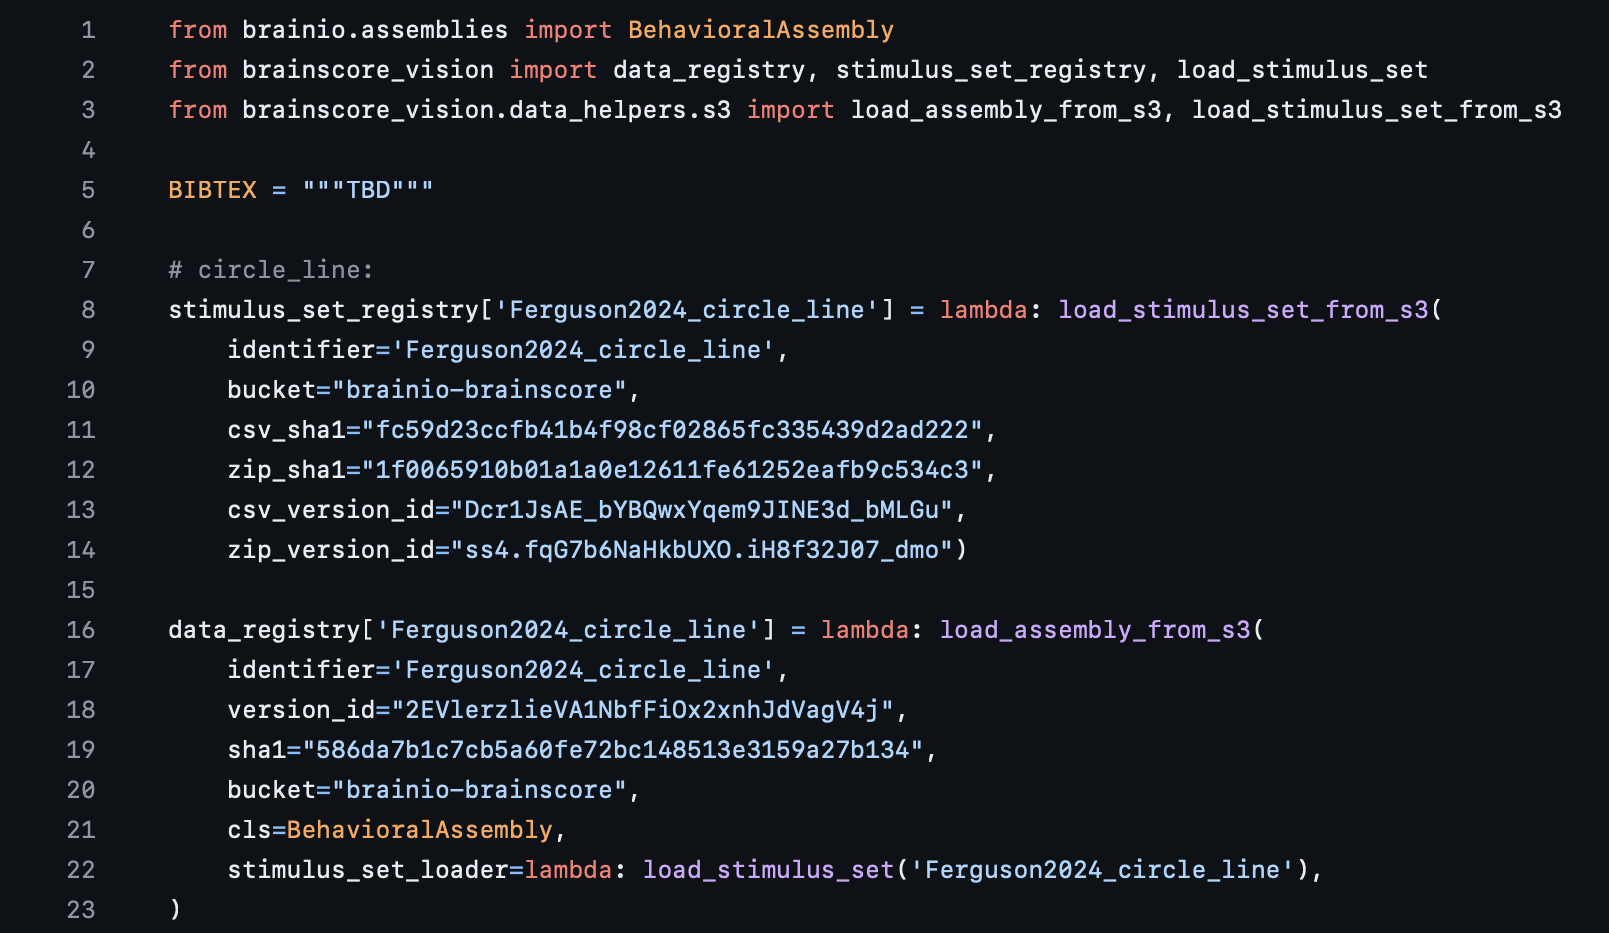
You will notice that adding a data plugin to the registry entails providing Brain-Score with information such as a csv_sha1 hash, a zip_version_id, and other fields. You will get this data returned to you after you upload your data via running a method in data_packaging.py. After you get that information, don't forget to go back and fill in your __init__.py file!
Note: In the Ferguson2024 sample folder's __init__.py file, there are multiple additions to the registry; in fact there are 28, whereas only two are shown in the screenshot above. The other 26 are different stimuli and data that use the same experimental setup: i.e., subjects were shown a circle with line in one case, then only a colored circle in another, etc. If you are packaging your data and your experiment has "sub-experiments", feel free to use this file as a template.
Also note: It would be prohibitively expensive to actually load every plugin in a registry before they are needed, so the plugin discovery process relies on string parsing. This means that it’s not possible to programmatically add plugin identifiers to the registry; each registration needs to be written explicitly in the form of plugin_registry['my_plugin_identifier'].
Another quick note regarding naming conventions: For data plugins, identifiers for datasets vary depending on the community but should ideally not include dashes (which are used in the benchmark identifier, see above). For brain and cognitive science datasets, data identifiers often point to the paper or report where the data was first introduced (e.g. MajajHong2015 or Sanghavi2020). When using components of datasets, we recommend separating those with a dot, and to use an underscore between multiple words (e.g. MajajHong2015.IT or Malania2007.vernier_only). For machine learning (“engineering”) datasets, data identifiers are often descriptive (e.g. ImageNet). Next, let’s check out the second required file, data_packaging.py.
Part 5: Exploring the data_packaging.py File
This file is the heart of the stimuli and data upload process, and is where we define how our stimuli and data is to be packaged. This file is meant to be run once, and will upload your stimuli and data to Brain-Score. Once it is run, it is good practice to include this file in your submission package; if the stimuli or data ever need to be repackaged, there is a record of how it was done - this is why this file is "required".
There are a couple of important parts to this file, and we will briefly cover each one. The first part we will look at is the create_stimulus_set_and_upload function, followed by the create_assembly_and_upload, and finally the BrainIO upload functions package_stimulus_set and package_data_assembly.
Data and stimuli can be made public or kept private. It is your choice if you wish to release the data or only the benchmark. If you choose to keep the data private, model submissions can be scored on the data, but the actual data itself will not be visible. Publicly released data can also be used for scoring, but will be fully accessible.
A quick note for context: Brain-Score uses a stimuli and data packaging management system known as BrainIO, because we require a certain format for stimuli and data so that we can maintain them for long-term use. BrainIO provides two very useful core objects: StimulusSets and DataAssemblys. StimulusSets (a subclass of pandas DataFrame) are used to maintain stimuli, and DataAssemblys (a subclass of xarray DataArray) are used to maintain experimental measurements. Aside from unifying data from different sources, the advantage of these formats is that all data are kept together with metadata such as image parameters, electrode locations, and details on behavioral choices. For both StimulusSet and DataAssembly, BrainIO provides packaging methods that upload to S3 cloud storage.

The first function of note is create_stimulus_set_and_upload defined, on line 16. Like its namesake suggests, this function is what actually reads in the stimuli paths (the for loop on line 38), extracts the metadata of those stimuli from the stimuli file name (lines 39-42), and puts them into a dictionary with user-defined keys (lines 45-49). At this point, there is no StimulusSet object, but rather just a simple dictionary structure. The call to the StimulusSet constructor on line 51 is what makes the StimulusSet itself, and lines 52-53 set metadata. This function will also upload the StimulusSet, but that is covered below and is not shown on the screenshot above. Note that the information contained in the comments on lines 19-32: this is done for documentation purposes, as users or contributors unfamiliar with your stimuli might need help understanding how images are named and what these fields mean.
Next, we will take a look at how a DataAssembly is created. In general, a DataAssembly contains the actual experimental measurements as well as any metadata on them. Note that these do not necessarily have to be raw data, but can also be previously published characterizations of the data such as preference distributions. As such, the person submitting the data to Brain-Score does not have to be involved in the data collection. If you package someone else’s data, we recommend checking the specifics with them to avoid misinterpretation. Overall in Brain-Score, we have encountered data in three forms:
NeuroidAssembly: neural data recorded from “neuroids” – neurons or their analogues such as multi-unit activity from Utah array electrodes. These assemblies typically contain spike rates structured in three dimensions presentation x neuroid x time_bin where the presentation dimension represents stimulus presentations (e.g. images x trials), the neuroid dimension represents e.g. electrodes (with metadata such as neuroid_id and location), and the time_bin dimension contains information about the start (time_bin_start) and end (time_bin_end) of a time bin of spike rates.
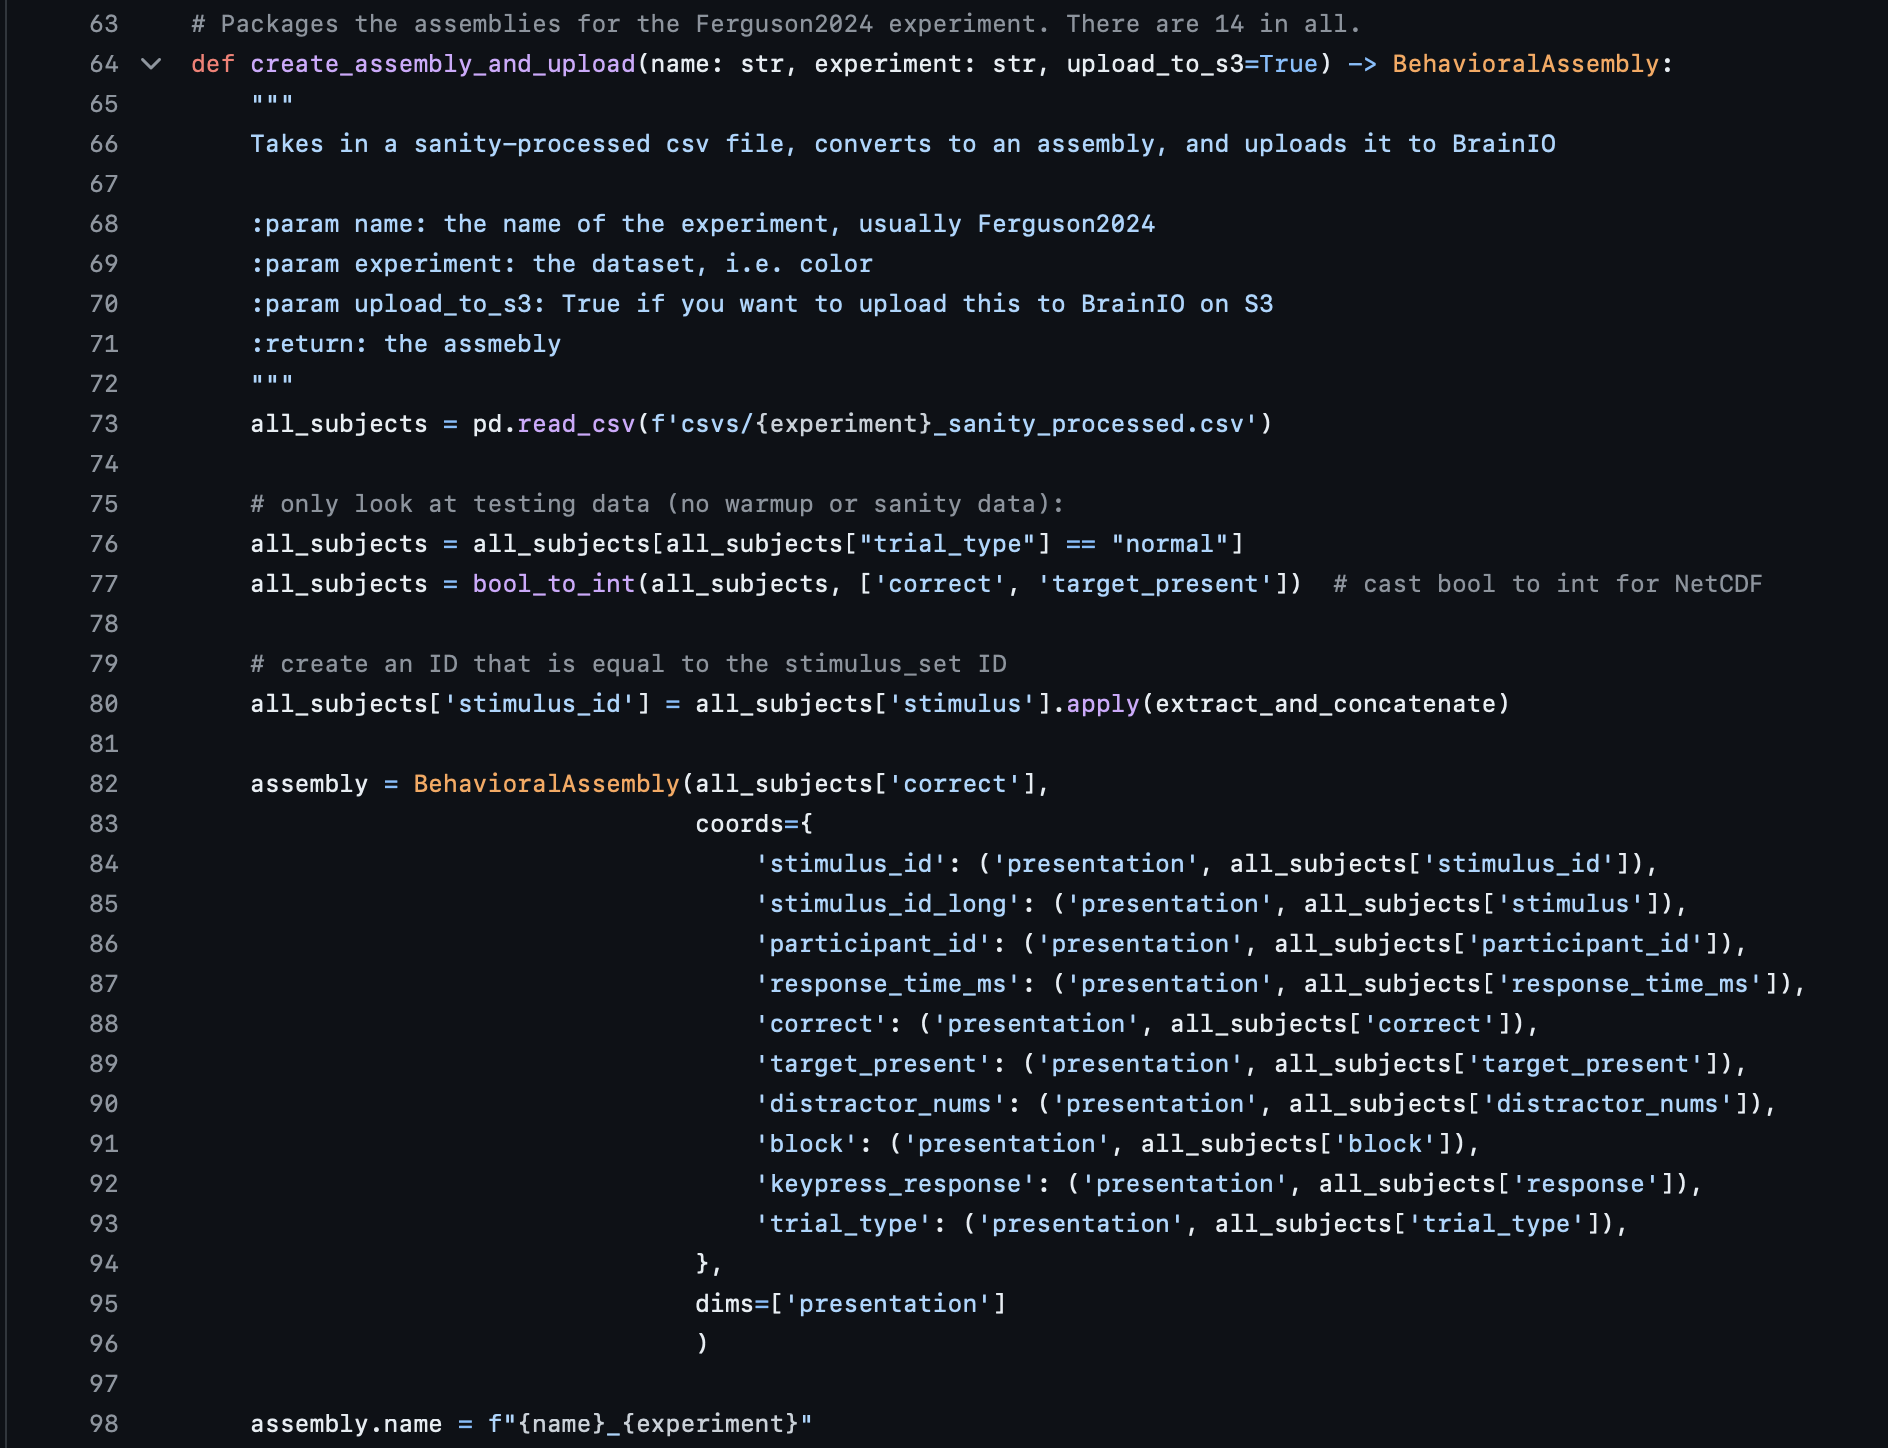
BehavioralAssembly: behavioral measurements, typically choices in a task structured in one dimension presentation that represents stimulus presentations (e.g. images x trials, with metadata on the task such as the sample object and the distractor object in a match-to-sample task) with the actual choices (e.g. “dog”/”cat”, “left”/”right”) in the assembly values. As stated, the screenshot above is of a sample BehavioralAssembly belonging to the Ferguson2024 benchmarks.
PropertiesAssembly: any kind of data in a pre-processed form, such as a surround suppression index per neuroid.
The DataAssembly itself is created in the method create_assembly_and_upload defined on line 64. It is here that the experimental subject data is packaged into a DataFrame object, which is then wrapped into a BrainIO BehavioralAssembly. Lines 73-80 can be safely ignored for this tutorial's sake, as they deal with preliminary data preprocessing. Lines 82-96 are the most important parts here; these lines take in a column of a CSV file, and place those columns into a DataFrame Object, which is then wrapped into an BehavioralAssembly. These columns can be seen being defined in lines 83-93, in the coords dictionary. In a nutshell, that is it for data packaging: you simply read in the data and place into a Pandas Dataframe, which is then wrapped into a BehavioralAssembly.
One question we often get asked is "What is the all_subjects['correct'] on line 82 doing?" The short answer is that this is setting the BehavioralAssembly's primary dimension. In Xarray, which is what is used behind the scenes for assemblies, there are dims and coords; the former is how a user defines the axes of the DataFrame object, and the latter is the actual data itself that is attached to that dim. So in this case, you can think of the assembly as having a "primary axis" called presentation (defined on line 95), and each presentation item has the attached coords (i.e, a stimulus_id, a target_present, a trial_type, etc). We usually use the notion of "correct" or not as the main dim, which is why line 82 is set the way it is. You can read more about Xarray here if you are interested.
Part 6: Exploring the test.py File
The purpose of the data plugin's test.py file is to ensure that your stimuli and experimental data validity can be confirmed for a long time, even as details in the system might change. For instance, we want to avoid accidental overwrite of a packaged experiment, and the unit tests guard against that. This is where you would add tests for checking the length of your stimuli and data, the data types, and the correct format. You will notice that the sample folder's test.py contains many tests, divided into two classes: TestStimulusSets and TestAssemblies (not shown in the screenshot below):
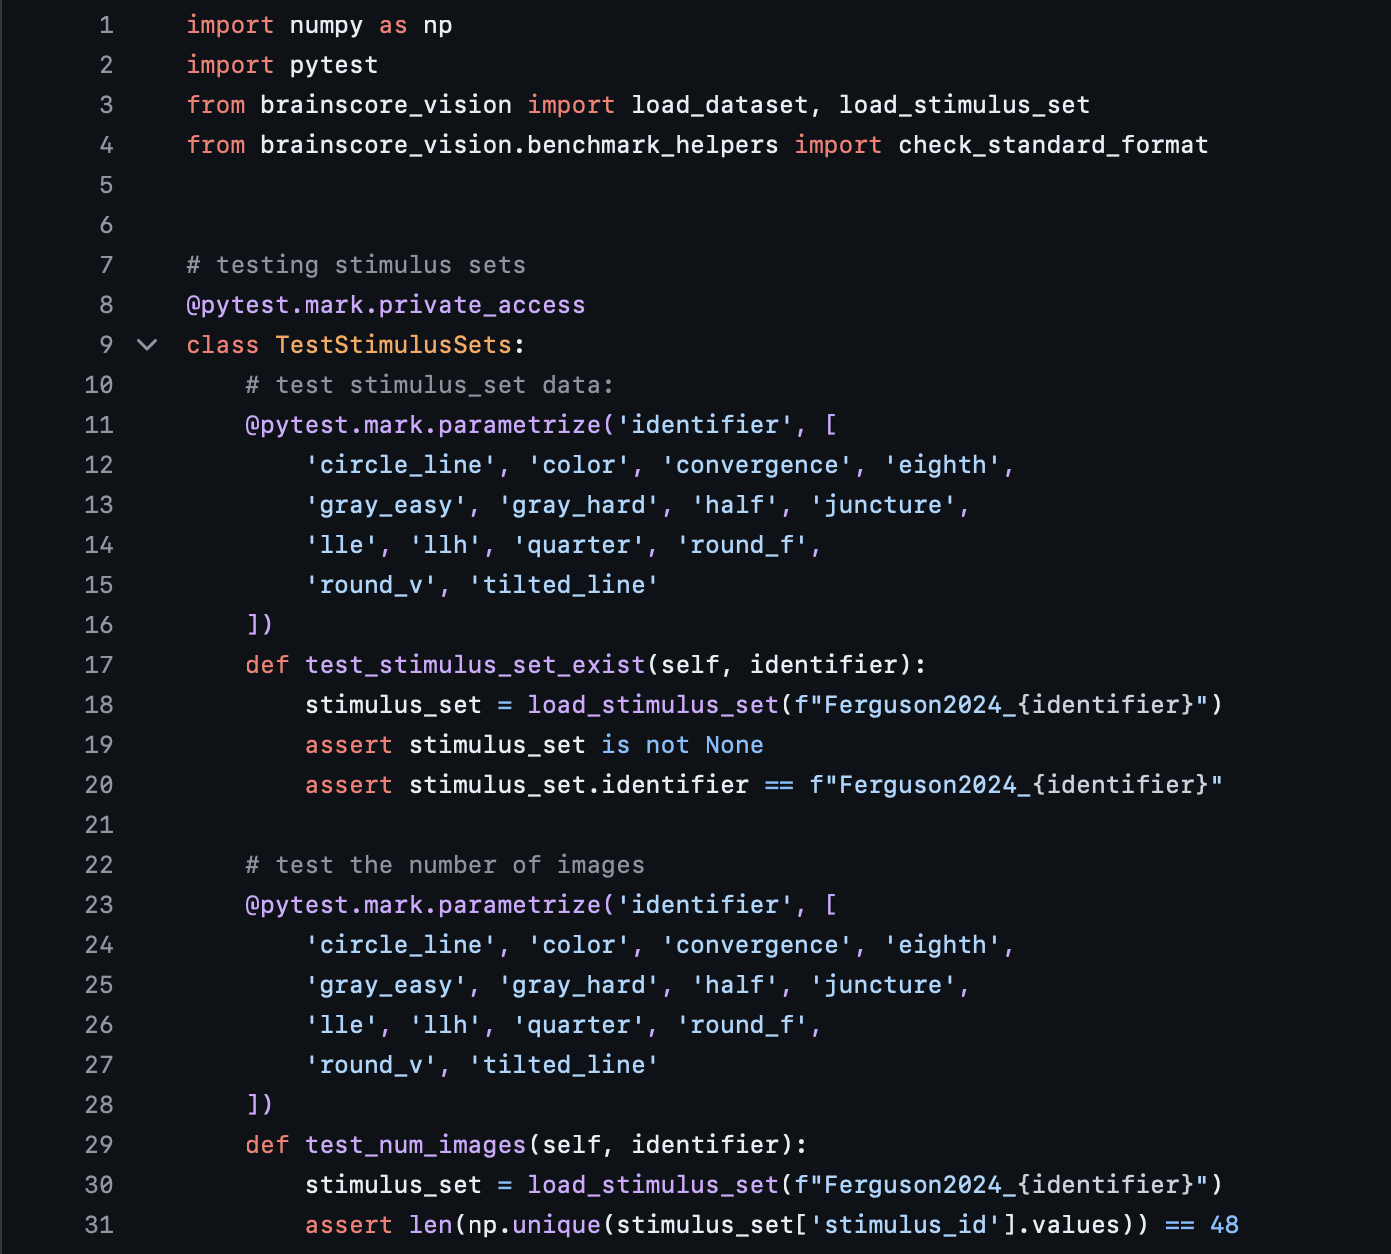
TestStimulusSets contains the tests for StimulusSets. and the tests in this section, as you can see in the screenshot above, mainly deal with checking the stimuli to ensure they contain what is expected - making sure that the length is correct, that they exist in the Brain-Score registry, etc.
It is much the same for the other test class, TestAssemblies, which ensures that the subject data is what is expected: the lengths are correct, that the data types are correct, etc.
Part 7: Putting it All Together
You are almost done! If you were actually submitting a data plugin, the final step would be to ensure that you (1) ran your code in data_packaging.py to upload stimuli and data, (2) your __init__.py file is populated correctly, and (3) your test.py file contains enough tests to accuracy cover your stimuli and data.
Once those 3 things are finished, you can send your files to a Brain-Score team member, who will then open a Github PR for you, where you can track your data plugin's progress.
Once your PR's tests pass and it is merged, you can move onto the next section of the benchmark tutorial, here. In this second half, we will cover how to actually create the benchmark evaluation itself: how to run models on your stimuli, collect model data, and compare with subjects.
A quick note for those interested in neural benchmarks: the process outlined above for a behavioral benchmark is nearly identical to that of a neural benchmark; in fact, a neural benchmark is actually somewhat simpler to package. Please visit our sample neural benchmark here to see what those differences are.

Our tutorials and FAQs, created with Brain-Score users, aim to cover all bases. However, if issues arise, reach out to our community or consult the troubleshooting guide below for common errors and solutions.